1. 普通の使い方
好きなフォントが見つかったら「 + Select this style 」していく。(複数可)

ヘッダー内に<link>をコピペ
<link href="https://fonts.googleapis.com/css2?family=Ubuntu:wght@300&display=swap" rel="stylesheet">
右側の「Use on the web」のコードをコピー(↑こんな感じ)して、自サイトの「ヘッダー」にペースト。これを入れればサイトで使用できる。
CSSを指定
font-family: 'Ubuntu', sans-serif;
要素に指定すればサイトで反映される。
新たに追加する場合
例(1種類だけ)
<link href="https://fonts.googleapis.com/css2?family=Neonderthaw&display=swap" rel="stylesheet">

例(2種類)
<link href="https://fonts.googleapis.com/css2?family=Neonderthaw&family=Ubuntu:wght@300&display=swap" rel="stylesheet">

※ この部分を追加すればいい
family=Ubuntu:wght@300;400;500&
family 〜 & の部分を、前回追加していた & の後ろに追加すればOK。
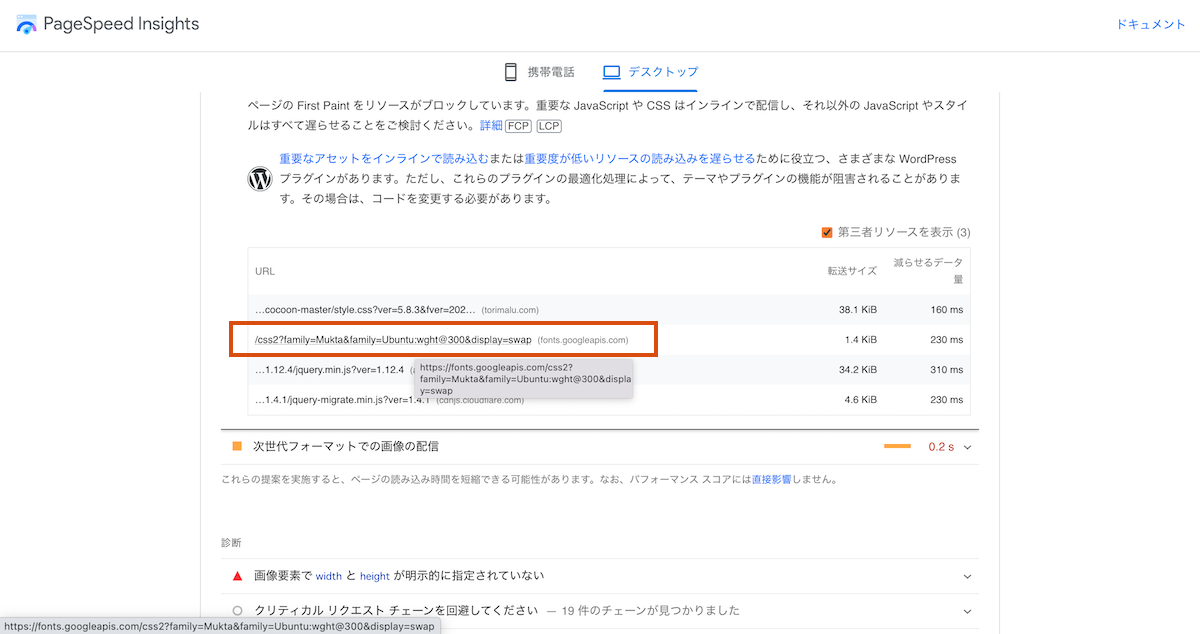
読み込み速度が遅い
 このように怒られるし、サイトを開いたときにフォントが変わる瞬間が見えてしまって萎える。サイト速度はなるべく速い方が良い。なのでプリロードは必要。
2. プリロードの仕方
- フォントを選ぶ
- フォントをダウンロード
- サーバーにフォルダを作って入れる
- ファイルのパスをコピペ
- ヘッダーにぶち込む
まずは「google-webfonts-helper」にアクセス。左上の「検索バー」に好きなフォント名を入れて検索。
1. Select charsets
スルーでOK。
2. Select styles
フォントの太さなどを選ぶ。必要な分だけチェックマークを入れる。
3. Copy CSS
@font-face {
font-family: 'Ubuntu';
font-style: normal;
font-weight: 300;
src: local('Ubuntu'),
url('ここにパスを入れる') format('woff2'),
}
・「Modern Browsers」にチェックを入れコードをコピーしどこかにペースト。
・「woff2」の行だけ残して不要な部分は全て削除。
・src: local(''),にフォント名をコピペしておく。
・url部分はのちほど。
4. Download files
クリックしてダウンロード。ファイルを開いて「woff2」があることを確認して、いったん次へ。
5. サーバーに追加
これは各サーバーで違ってくる。今回はこのブログで使っている「コノハウィングス」で解説。ログインしたら、
「サイト管理」→「ファイルマネージャー」→「public_html」→「https://(自分のドメイン)」→「wp-content」→「themes」→「cocoon-child-master」→「Fonts」(無ければ右クリックから新規フォルダを作成)→「ここに先ほどの woff2ファイル をドラッグ&ドロップ」
「ファイルを右クリック」→「情報(下の方にある)」→「パス(URL)」の部分を右クリックしてコピー。
6. パスを追加
@font-face {
font-family: 'Ubuntu';
font-style: normal;
font-weight: 300;
src: local('Ubuntu'),
url('https://torimalu.com/wp-content/themes/cocoon-child-master/Fonts/ubuntu-v15-latin-300.woff2') format('woff2'),
}
「wp-content〜」以降の部分だけをコピーし赤文字部分にコピペ。
7. プリロードを指定
<link rel="preload" as="font" href="https://torimalu.com/wp-content/themes/cocoon-child-master/Fonts/ubuntu-v15-latin-300.woff2" crossorigin>
赤文字部分に先ほどの「パス」をコピペ。
8. HEADに貼る(完成形)
<link rel="preload" as="font" href="https://torimalu.com/wp-content/themes/cocoon-child-master/Fonts/ubuntu-v15-latin-300.woff2" crossorigin>
<style>
@font-face {
font-family: 'Ubuntu';
font-style: normal;
font-weight: 300;
src: local('Ubuntu'),
url('https://torimalu.com/wp-content/themes/cocoon-child-master/Fonts/ubuntu-v15-latin-300.woff2') format('woff2'),
}
</style>
とにかくこの赤文字部分をそれぞれの値に変更すると覚えておけばOK。<style> </style>で囲む必要あり。
※このコード↑をそのままコピペするとバグる可能性(多分色をつけてるから)があるので、下にコピペ用を置いておきます。
9. コピペ用コード
<link rel="preload" as="font" href="xxxxx" crossorigin>
<style>
@font-face {
font-family: 'xxxxx';
font-style: xxxxx;
font-weight: xxxxx;
src: local('xxxxx'),
url('xxxxx') format('woff2');
}
</style>
xxxxxの部分の値を変えればOK。
ワードプレスは「かな」状態で「テーマエディター」を操作するとバグることがあるので、入力する時は「英数」状態で。見た目上は一緒なので分かりにくい。もし治らない場合は一旦怪しい部分を削除して半角で打ち直すと治る。か、戻る。
10. 複数追加
<link rel="preload" as="font" href="https://torimalu.com/wp-content/themes/cocoon-child-master/Fonts/ubuntu-v15-latin-300.woff2" crossorigin>
<link rel="preload" as="font" href="https://torimalu.com/wp-content/themes/cocoon-child-master/Fonts/sacramento-v8-latin-regular.woff2" crossorigin>
<style>
@font-face {
font-family: 'Ubuntu';
font-style: normal;
font-weight: 300;
src: local('Ubuntu'), url('https://torimalu.com/wp-content/themes/cocoon-child-master/Fonts/ubuntu-v15-latin-300.woff2') format('woff2'),
}
@font-face {
font-family: 'Sacramento';
font-style: normal;
font-weight: 400;
src: local('Sacramento'),
url('https://torimalu.com/wp-content/themes/cocoon-child-master/Fonts/sacramento-v8-latin-regular.woff2') format('woff2');
}
</style>
複数のフォントを追加したい場合は、今までの手順を繰り返した後に、このように<style> </style>内に追加していけばok。
おさらい
- フォントを選ぶ
- フォントをダウンロード
- サーバーにフォルダを作って入れる
- ファイルのパスをコピペ
- ヘッダーにぶち込む
あとは好きな要素にCSSを指定してあげればOKです。爆速で読み込まれます。


